Friday, June 28, 2013

In Focus Friday w/ My Mind's Lens: June 2013

Thank goodness that today is time for In Focus Friday....otherwise, it could very well be a post-less week.  Last week five - this week nada (yep, I am a hot mess).  I actually have stuff to say, just haven't had the time to put it into words.  Anyway, today Kaeley from My Mind's Lens is going to share some images that inspire her as well of some of her own favorites.  I can relate - I haven't even come close to figuring out my new (to me) toy, but I would kill to capture a sunset like the one below - heck, I would be satisfied just to see it in person!

Photobucket


I cannot believe it is already the end of the month again!  I sure hope the rest of the summer doesn't go by so quickly...I need to be able to enjoy it a little more!

Inspiration.  Not only is "INSPIRE" my one little word for the year, but I think any photographer looks for inspiration.  It's what makes them great.  They may search in nature, in the faces of people they pass on the street, or sometimes it may come to them without even looking.  Unfortunately, the age of Pinterest had not yet come when I was planning my wedding *Or maybe that is a good thing?!*  But now that it is here, I often look there for inspiration in many things - including recipes, motivation to get in shape, and even photography.

It isn't that I "copy" other people's work - but I look for ideas . . . different poses or environments to work with.  Here are some samples of my latest Pinterest inspirations:

BABIES:


COUPLES:


SENIOR PORTRAITS:

 
LANDSCAPES:


 *If you click on any of the above photos you will be taken to the source page*

To wrap up, here are a few of my favorite photos from my June sessions.  Maybe they will inspire one of you...


Tonight, I am off to pick up my most favorite guy from Allaso Ranch in East Texas...

Looks like he is having fun!!!
and then tomorrow I am going to an all day crop at this great new scrapbook store that we found a couple of weeks ago.  Hopefully, I will have a good amount of Project Life style pages to share come next week - my fingers are crossed.  If I get scrapper's block - I might just lose my mind!  Have a wonderful weekend and I will be seeing you next week - PROMISE!

Friday, June 21, 2013

Gallery Wall Advice....HELP!!!!!

TGIF!  I am glad that the weekend is just hours away...how about you?  Since I got such awesome feedback on my scrapbooking dilemma earlier in the week (thank you all so much for taking the time to respond), I thought I would throw this out.  I am obsessed with gallery walls - well if you know me at all, you know that I am obsessed with pictures in general.  I had a tiny one in my apartment.  It was comprised of a black and white photo of my son each year between 2 and 8 years of age.  I wish that I had a photo to share...sorry.  I also have a small one of pictures from his first year that is currently hanging in my hall.  Since then, I have of course moved, and I now have a fairly large....completely empty wall patiently waiting for me to get my crap together and make it fabulous.  My son will be *gasp* 13 this November so doing the math ages 9-12 have, thankfully been captured, but I have not printed the pics that I want to add to the wall.  Before, it was really a matter of space - now it is a matter of I am not really sure what direction to go.

I thought I had it all figured out.  I thought that I was going to do the next four canvas style and mix the framed pictures with the canvases.  Now I am questioning myself.  My latest thought is to stay with all black frames, but start printing in color.  And....do you think it is freaky to have a wall with only pictures of  Zach?  Should I mingle other pictures in with it?  Won't that make it a big confusing mess?  HELP!!!!!!

I would love to hear from those of you that have already mastered a gallery wall in your own home.  Or if you haven't, but have an idea or thoughts on my predicament - sound off!  The pictures are doing me no good in a box in a corner of my room or hanging out on my computer, begging to be printed.

I just realized that I had a post everyday this week....holy moly!  Have a wonderful weekend!

Thursday, June 20, 2013

Third Thursday Scrapbook Stories: June 2013

Katie is here today for the June installment of Third Thursday Scrapbook Stories.  I always love to see her latest layout and she never disappoints!  As you will see below, she is a die hard baseball fan and really those are the very best kind of fans.  On a side note,  from a very reliable source I hear that Katie may very well be visiting The Lone Star State - I can hardly stand it!!!!  Stay tuned for more details.....


Photobucket

Its June (already!) Which means baseball season is in full swing!

Of course, my team isn't very good consistent. And unfortunately, more often than not, amazing wins are followed by loooong losing streaks.

But, that doesn't stop me from loving baseball season! And catching a game whenever, wherever I can.

And, of course, being at the game calls for a layout! Sometimes though, I don't want to do (one of my) traditional baseball layouts (like this one and this one).

So even though I was scrapping a baseball game, I broke out the Halloween paper...


I love the stars, because they so remind me of looking up in the middle of a night game. And even though its not decked out in team colors, pennants, logos and mascots - I'm super happy with my not-so-traditional (for me) baseball layout!

Do you ever get stuck in a box for repeated events? Or do you like to jump outside of it!

Wednesday, June 19, 2013

WOYWW and Guest Posting

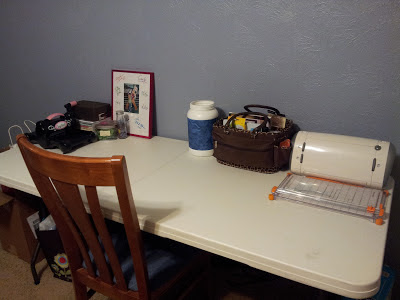
Ladies, I am on a roll this week. Three post in three days....watchout! There are also some exciting things happening on my workdesk. It may look like absolutely nothing is going on, but therein lies the beauty. This is the first time since I moved that I have had a designated scrap area. Who am I kidding, this is the first time since I started scrapping that I have had a space that wasn't my dining room table....to say that I am excited would be quite an understatement! Thank heavens for friends with extra folding tables that don't mind sharing!

Why, yes.  I think there is room to scrap.
My Big Shot, box of  Sixxiz dies, lots of flower embellishments and a favorite photo of  Zachary and Pluto from the Disney Cruise...complete with autographs : )
Cricut, cutter, tote with essentials that I pretty much take everywhere, and a canister for trash when I am scrapping
I still have a long way to go, but this is a great start and I couldn't be happier to have the first step completed.  I am linking up with Julia from Stamping Ground for her weekly installment of What's On Your Workdesk, Wednesday.  Where crafters from all over the world link up and share what they have going on.  If you are a scrapper and happening to be visiting today, please check out my previous post and give me your two cents on Project Life vs. traditional scrapping.  I would love to hear from you!

In case you haven't had enough of me today after all of that, I am guest posting  for Kaeley over at My Mind's Lens.  She is celebrating her 1 year blogiversary this week and also has a fun giveaway going on...head over, you have nothing to lose!!!!  I am sharing some layouts that I did for my son's "proof book".  If you are curious about what that is, head over to Kaeley's and check out my post.  Thanks for stopping by and have a great day!

Tuesday, June 18, 2013

Old School Style Scrapbooking vs. Project Life

For those of you that utilize Project Life or at least know the concept and how it works, I need your input/advice. I started my latest scrapbook on Saturday. I have been really excited about it for quite awhile. It is from the trip I took to Cabo San Lucas for my dear friend Megan's wedding to her high school sweetheart Justin. The whole trip was pretty awesome and I am finally set to document it - old school scrapbook style. All of my pictures are sorted by date and event so I am ready to go. Bur herein lies my dilemma. I did the first two page layout and I am really just not feeling it. Months ago, I bought this package of paper that I just knew was going to be perfect for this project, now that I have started using it, I am just not so sure. Something is pulling me to try to do the whole album PL style. Maybe still use the paper in small doses here and there, but not as originally planned. What are your thoughts on doing an entire trip album PL style as opposed to documenting everyday life? Is it cheating - am I taking the easy way out? Will I be as happy with this album when it is complete as I am with the traditional books that I have done? I would love to know what you think or if you have any ideas. At this point I have only completed two layouts so I am still on the fence...I could go either way. I am attending an all day crop on the 29th, so I have to have a clear direction by then - let me know what you think! Thanks for stopping by!

Monday, June 17, 2013

A Blogiversary Giveaway....but not mine

Happy Monday....ok, that is kind of an oxymoron!  But anyway, just stopping in for a quick shout out.  One of my wonderful contributors, Kaeley, is celebrating her first blogiversary over at My Mind's Lens with her first hosted giveaway.  I was more than happy to contribute. so head over and check out the goodies!!!!


Wednesday, June 5, 2013

WOYWW

I have been absent from WOYWW for far too long.....kind of like I have been absent from scrapping for WAY too long.  However, I am making moves to rectify that regardless of what the current state of my desk leads you to believe.  Trust me, up until last week....there was no desk.  I am currently beyond thankful for this borrowed folding table.


I made it through all of the graduation decorations by completely bombing the dining room table, which I swore once I moved, I would not do.  I promptly cleaned it up and it is back to actually being a place where Zach and I can eat.  The disaster above is a result of me having to dig  through 5 huge boxes of crafting supplies to find what I needed for the table decorations.  There is no rhyme or reason....completed scrapbooks, stuff to be scrapped,  Stampin. Up idea books, Cricut box, my Christmas cork wreath etc. not to mention that painfully bare wall that needs some serious decorating!!!

My desk is definitely a hot mess....but I wanted to jump back in and hopefully next week things will be a bit more organized and maybe there will be something productive going on.  I am fairly certain that I hear those 4+ year old Cabo San Lucas pictures whispering my name.

If you aren't familiar with WOYWW, it stands for What's On Your Workdesk? Wednesday and is the brain child of Julia from Stamping Ground.  Every Wednesday crafty folks from all over the world...literally....link up to share what they have going on in their craft space.  Thank you for stopping by and Happy Hump Day!!!!!

Tuesday, June 4, 2013

Table Decorations: 101

Earlier in the year, I was asked if I would be willing to help with table decorations for Zachary's 6th grade graduation dinner.  I am sure I was asked because during class parties, goodies would show up like this: nothing super fancy, but I loved  providing crafty party favors.


In true me fashion I kind of took over.  Several of the other moms graciously offered to help and I told them I would let them know if I needed anything.  If the truth be told, I prefer to work alone on projects like this.  I firmly believe it is the "only child syndrome" kicking in.  I get the vision and refuse to believe that anyone can be on the same crazy train that I am.  Then I stress....I start wondering if I bit off more than I could chew, are they going to turn out the way I envisioned and it goes on...and on....and on.

I wanted the decorations to double as something that could be taken home by each family (i.e. party favor) and I wanted each one personalized to the student.
Graduation Party Centerpieces.
Source
Use Red or navy balloons for centerpieces on the tables
Source
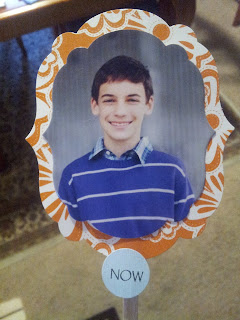
I didn't find much on Pinterest that I thought would be appropriate, I think because this was only a 6th grade graduation - but the two pics above were my inspiration. I asked each family to provide me with a Kindergarten and 6th grade photo of their son.  I cropped and matted each one. Then I put each boy's photos back to back on a small stick.  I made some small THEN and NOW circles and also attached those with the coordinating photo.


I guess I should back up....prior to call of this crafty stuff  going on in my world, I did have some help.  I am a drippy spray painter.....I attempted it for the first time back in December and it wasn't exactly pretty.  Luckily, a dear friend was more than happy to lend a helping hand and he spray painted 10 terra cotta pots and saucers.  My mother, who has a bit of a green thumb planted 20 Portulaca in said pots.  And now back to the crafty stuff....

Zachary's teacher had emailed a great class photo of all of the boys at the beginning of school.  I made 10 copies and also matted those as well.


I also made homemade confetti with coordinating paper for the tables, but sadly, somehow managed to leave it at home when I was packing everything up.  I was sad when I realized it, but there was just not enough time to go back for it.


Then there was this banner....I loved the fun colors and the funky font, but once it was hung up, it was really hard to read it....boo!!!!!

Congratulations PRCA Class of 2013


My final pop of color for the tables were Gerbera Daisies.  Luckily, Zach loves Izze natural soft drinks, so there was no arguing when I told him we needed to start collecting bottles.


I added a small placard to each pot with the title of the famous Dr. Suess book "Oh, the Places You'll Go".  I put the finishing touches on the pots over at my parent's house since that is where my mom did all the planting.  We both got a little emotional as they were coming together...the boys are so grown up and the time has just flown by. The majority of the boys have been together since at least Kindergarten.


Even though the actual pot was not decorated on both sides, the picks that I placed in the pots were so that the decorations could be enjoyed from either side of the table.  Here are a few shots  from the party:


Obviously, I still have a lot of work to do with that new camera!  I am so glad that I was able to do this for Zach and his class, but I am glad that there won't be another graduation for six years!

Monday, June 3, 2013

First Mondays With Megan: June 2013

It is the first week of JUNE....what the what?!?!  You are in for a fun DIY treat today courtesy of Megan from The House of Martinez.  She has provided step by step, easy to follow instructions on how to create your very own Chevron lampshade.  It can be easily customized to whatever color would work with your decor.
Photobucket


DIY: Chevron Lamp Shade

I have been obsessed with chevron for quite some time. And now I can add another

decorative accessory to my collection with this DIY chevron lamp shade.

MATERIALS:
- white drum shade
- paintbrushes
- painters tape
- acrylic paint (color(s) of your choice)

The great thing about a chevron pattern, especially on a rounded surface, is that
 the pattern is very forgiving, and doesn’t have to be lined up perfectly to look 
like it’s lined up perfectly.

Step 1: Decide how large you want your chevron pattern to be, I chose a little over
3″. Measure from the base of the shade, up to whatever height you’ve chosen for 
your pattern, and place a strip of blue tape at that height, rotating and placing the 
tape while measuring every few inches to make sure the height is consistent.

shade1

Step 2: Place blue tape in chevron pattern, with the bottom points just touching the
bottom of the lamp shade, and the top points just touching the bottom of the blue 
line you placed above in step 1. You may have to adjust your lines a bit once you 
get around the shade to make sure there is enough room for all of them. Again,
don’t be too worried about each repeat being the exact same width. If it looks even 
to the eye, it will look even when you’re done. Once you have finished placing the 
first row, remove the line of tape we placed in step 1.

shade2

Step 3: After you’ve removed the line, start repeating the pattern, being sure to
leave approximately the same amount of space between each line. Use scissors to 
trim the edges and make clean points. Repeat row after row until the entire 
lampshade is covered. Don’t forget to place little corner pieces of tape along the
bottom of the shade to fully complete the pattern.

shade3
shade4

Step 4: Using a stencil paintbrush, paint in a dabbing motion to avoid paint leaking
under the tape.

shade5

Step 5: Remove the tape, and voila! You’re done!

shade6shade7

Please stop by tomorrow, when I will be sharing the decorations I did for Zachary's 6th grade graduation party.  Have a wonderful Monday!