

I am really excited for Katie's post today. I doubt that many of you are like me, but the extent of what I can do myself on my blog stretches to actually typing a post and adding some pictures...anything more advanced than that, and I am calling for help! With this easy to follow tutorial on watermarks, I can add another task to my "Yes, I can" list. As a side note, Katie walked me through this months ago, but I am so glad to now have it all down in writing because I am fairly certain that I would struggle to conquer watermarks again without it!
******************************
Last month, I was not in a very crafty mood. And this month, I haven't been very much either. There's been a lot going on, and I just haven't had as much time to get into my scrap room. I'm hoping once I finish grading everything for the end of the year, I'll have more free time.
So, with nothing crafty going on around here, I was trying to think of something else important and fun that I could share. And recently, I changed a few things around on my blog, including my watermark. I love being able to change it so easily to match whatever is going on on my blog at the moment.
And that's how I ended up with this watermarking tutorial, so you can create your own personal watermark!
Step 1 | Getting started

Step 2 | Create a transparent background

Click on the pallet {red arrow}, then transparent background {purple arrow}. This is your transparent canvas now. Go to edit {blue arrow} to start making your watermark.
Step 3 | Create your watermark.

I usually just type for my watermarks {orange arrow}. Now is also the time to crop your canvas to fit your watermark {pink arrow}. When its ready, click on save {purple arrow}.
Step 4 | Save it

Make sure you save as a png to preserve the transparent background! After you save it, it will bring you back to your edit screen. I usually like to save a white version of my watermark too (just change the color of the font) because sometimes white works best with your photos, sometimes black does!
Step 5 | Open your picture
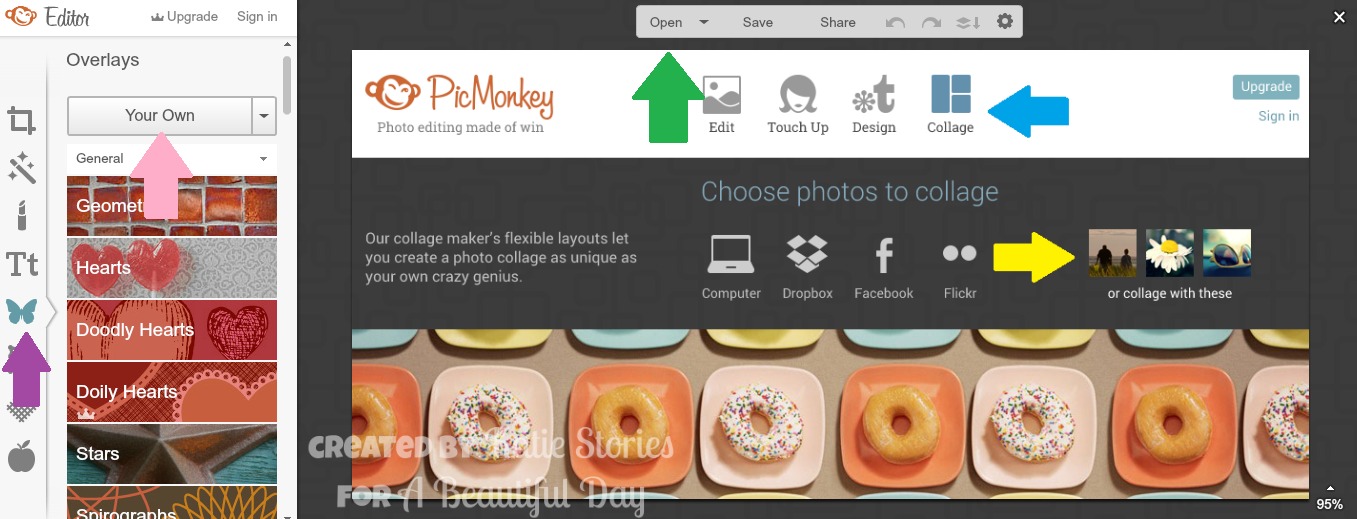
Open the picture you want to watermark {green arrow}, click on the pretty butterfly {purple arrow} and choose your own {pink arrow}. Open up your watermark (from wherever you saved it).
Step 6 | Watermark it

Drag your watermark to wherever you want it {orange arrow}. I like to put it at 50% fade so it blends in {blue arrow}. Now share your picture wherever you want!
Do you like to create your own blog updates - headers, watermarks, buttons? What is your favorite way to make them?
******************************
Thank you so much, Katie! I feel quite sure that this tutorial will help others like me that have computer fright as far as their blogs go...OK, maybe that is only me?!?!? If you are new to snap.scrap.share. and would like to see Katie's crafty goodness - Project Life, scrapbooking and crafts, not to mention yummy recipes, be sure to visit her blog Katie Stories. Thanks for stopping by today!

This is very helpful and informative!!! I will be saving this post. I've never created a watermark before so this is cool. Have a great day!
ReplyDeleteThis is funny, I just learned how to do this in Photoshop in my photo class! I'm pinning this version anyway because I still use Picmonkey a lot. Thanks Julie and Katie!! You're quite the dynamic duo!
ReplyDeleteYou know, I use to know how to make my own watermark but then Picasa changed their editing program and I never figured out how to do it again. This is great!!
ReplyDeleteGreat tutorial Katie!!
ReplyDeleteI am computer illiterate and I think I may be able to manage this.
I do use Picmonkey for my fake watermarks…I just add text on my photos.
But I would love to add a little image to them as well. I will give this a go :)
Ooooh, pinned this! Thanks for sharing, Katie!
ReplyDeleteI used to be able to do it on Picasa as well but haven't in a long time.